MAX2C4D Interface Guide — Every Button Explained
MAX2C4D has exactly two windows: an Export dialog inside 3ds Max and an Import dialog inside Cinema 4D. This page walks through every button, checkbox and dropdown in both — short version first, hit the + for the full details.
How the Two Dialogs Fit Together
The 3ds Max side exports your scene into a folder — geometry as scene.abc, materials, lights, cameras and render settings as scene_materials.json, plus a tex/ folder with copied textures. The Cinema 4D side imports that folder and rebuilds everything as native C4D objects and shaders.
Since V2 that export step is optional. The Native reader route skips it entirely — MAX2C4D decodes the .max itself, with no 3ds Max on the machine. The two routes that do use an export are the same route cut in half: 3ds Max builds the export and imports it in one go, Existing export imports one that already exists.
The Export Dialog (3ds Max)
Open it from the MAX2C4D toolbar icon or menu inside 3ds Max. It does one job: turn the current scene into a folder Cinema 4D can read.
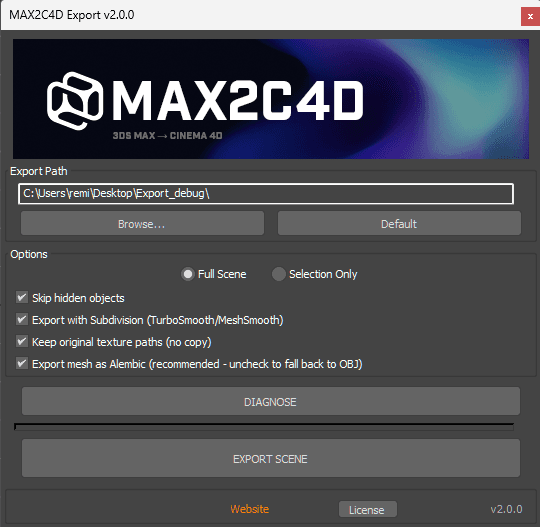
Export path
Export Path + Browse…
The output folder where the exported scene is written.
Default
Resets the path to the standard folder, C:\TEMP3D\max2c4d\.
Options
Full Scene / Selection Only
Default: Full SceneExport the entire scene, or only the objects currently selected in the viewport.
Skip hidden objects
Default: onHidden objects are left out of the export.
Export with Subdivision (TurboSmooth/MeshSmooth)
Default: onBakes subdivision modifiers into the exported mesh, so C4D receives the smoothed geometry.
Keep original texture paths (no copy)
Default: offOff = textures are copied next to the export. On = keep the original absolute paths, copy nothing.
Export mesh as Alembic (recommended — uncheck to fall back to OBJ)
Default: onLeave it on. Off writes the older scene.obj instead.
Actions
DIAGNOSE
Pre-flight check: a full report of everything that could go wrong before you export.
EXPORT SCENE
Runs the export: writes scene.abc, scene_materials.json and the tex/ folder.
The Import Dialog (Cinema 4D)
Open it from Extensions → MAX2C4D Import in Cinema 4D. This is where scenes are rebuilt, and where you choose which of the three routes reads the .max file.
Three tabs run along the top. Import is this one, and it is the only one that needs a .max file. Convert works on the Cinema 4D document you already have open and never touches a .max — covered below. Setup holds the handful of settings you fix once per installation.
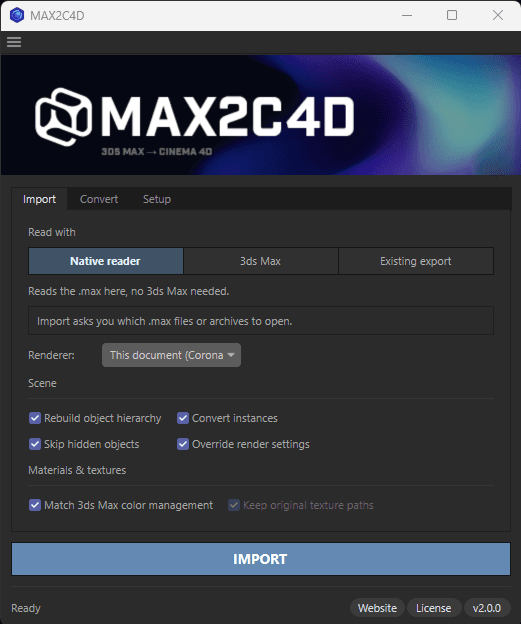
Read with
The three old import buttons are now one choice, because they only ever answered one question: who opens the .max file. Pick a route, then press the single IMPORT button. A line under the choice says what the route does, and a framed line under that says what is about to come in — so the click is never blind.
Native reader
DefaultReads the .max here, decoding the format itself.
3ds Max
Windows onlyHands the file to 3ds Max in the background, then imports the result.
Existing export
Reads a folder 3ds Max already wrote.
Renderer: From the Max scene / This document / Corona / V-Ray / Redshift
Default: From the Max sceneWhich material converter rebuilds the scene.
IMPORT
Starts the import, whichever route is selected.
Import options — Scene
The Import tab holds what you decide for this import, in two labelled groups — Scene and Materials & textures — with the IMPORT button under them. What you set once per installation lives in the Setup tab instead. Every value is remembered, so nothing here needs revisiting between two imports of the same kind.
Rebuild object hierarchy
Default: onRecreates 3ds Max groups and parent/child links in Cinema 4D.
Convert instances
Default: onRecreates 3ds Max instances as true Cinema 4D render instances.
Skip hidden objects
3ds Max route onlyTells the background export to leave hidden objects out.
Override render settings
Default: onApplies the render resolution and Corona/V-Ray/Redshift render settings from the Max scene.
Ignore skylight portals
Default: offLeaves V-Ray skylight portals out of the import.
Import options — Materials & textures
Match 3ds Max color management
Default: offAligns the C4D document's color management with the Max scene's.
Keep original texture paths
3ds Max route onlyLinks textures at their original locations instead of copying them.
Setup
The third tab: what you set once, not once per import.
Export folder
The folder both dialogs share, with a Browse… button.
Drag & drop: Native reader / 3ds Max when available
Windows onlyWhich route handles a .max dropped straight into Cinema 4D.
Keep Max alive: Off / 5 / 10 / 15 / 30 min
Windows onlyKeeps 3ds Max running between imports so the next one skips the slow startup.
The Convert Tab (No .max Involved)
The other two tabs answer “who reads this .max”. This one does not read a file at all: it rebuilds the Cinema 4D document you already have open onto a different render engine, in place. Same window, because it is the same machinery underneath — the engine writers used on the way in from 3ds Max are the ones used here.
It reads a Corona or V-Ray scene and writes Corona, V-Ray or Redshift — four routes, since a scene never converts to the engine it already uses. A Redshift scene cannot be the starting point yet: Redshift materials are node graphs rather than flat parameter lists, and that reader is still being written. Open a Redshift document on this tab and CONVERT SCENE greys out with that reason on the line underneath, rather than failing after you click.
Convert to: Corona / V-Ray / Redshift
Which engine the open document becomes.
The pre-flight report
What the tab found, before you commit to anything.
CONVERT SCENE
Rebuilds the open document on the target engine.
Every route, every material class and the full list of limits: the scene converter page.
Explore the rest of MAX2C4D
Features
Every supported material, shader and renderer setting.
How it works
Step-by-step walkthrough of a real conversion.
Batch exporter
Convert 40 .max files overnight, unattended.
What transfers
The full compatibility matrix, class by class.
Pricing
1-year license. All updates included. Money-back guarantee.
Related Guides
How to Open .max Files in Cinema 4D
Why C4D can’t read .max natively — and the workflow that fixes it.
Convert 3ds Max Scenes to Cinema 4D
Full conversion guide — geometry, materials, lights, cameras and render settings.
3dsky / Evermotion Assets in C4D
How to use .max archviz asset libraries in Cinema 4D without losing materials.
Frequently Asked Questions
Two dialogs. One click. Every material intact.
Now that you know what every button does — put them to work.
Get MAX2C4D — $99