Switch from 3ds Max to Cinema 4D — Studio Migration Playbook
Audit 50-200 legacy .max projects, batch-convert with Corona & V-Ray materials intact, run a hybrid Max/C4D pipeline during the transition. Real timelines from archviz studios.
Why Studios Are Switching
Modern UI. Apple Silicon. Same Corona/V-Ray. More predictable licensing.
A growing number of archviz and motion design studios are evaluating Cinema 4D as a replacement for 3ds Max. The reasons vary by studio, but several themes come up consistently:
- ·Modern UI and MoGraph — Cinema 4D's interface is widely considered more intuitive than 3ds Max's, and the MoGraph toolset is unmatched for motion design, broadcast graphics, and procedural modeling.
- ·macOS and Apple Silicon — Cinema 4D runs natively on Apple Silicon, the only major DCC in this space with full ARM-native macOS performance. 3ds Max is Windows-only.
- ·Growing adoption in archviz — Cinema 4D's share of the archviz market has been growing steadily, driven by tight Corona and V-Ray integration.
- ·Same renderers, same quality — Corona and V-Ray are available on both platforms. Materials, render quality, and output are identical. Switching from Max to C4D doesn't mean switching renderers.
- ·Licensing flexibility — Maxon offers perpetual and subscription licensing many studios find more predictable than Autodesk's subscription-only approach.
Corona materials render identically in Cinema 4D and 3ds Max. V-Ray scenes produce the same output. Detailed mappings: Corona materials guide · V-Ray render parity.
The Migration Challenge
50-200 legacy .max files. Materials must transfer. FBX kills them.
The real blocker for most studios isn't learning Cinema 4D — it's the legacy projects. A typical archviz studio might have 50 to 200 .max project files accumulated over years of production. Each one contains hundreds of Corona or V-Ray materials with carefully tuned shaders, custom render settings dialed in for each scene, and texture paths pointing to a shared NAS or network drive.
These aren't throwaway files. They're the studio's production archive — client projects that may need revisions, template scenes used as starting points, and reference files defining visual standards. Restarting from scratch is not realistic. Rebuilding 200 materials per scene across 100 projects means tens of thousands of hours of tedious manual work.
FBX export strips all Corona and V-Ray materials, so that path leads to untextured gray geometry. Side-by-side breakdown: MAX2C4D vs FBX comparison. Manual rebuild instead? See why it doesn't scale.
What you need is a converter that preserves everything — materials, lights, cameras, render settings, texture paths — so that each .max file opens in Cinema 4D ready to render without manual intervention.
Three Migration Approaches
Pick a strategy. Most studios end up phased.
How aggressively you switch matters as much as the tool you use. Three strategies show up across studios:
Big-bang Migration
Convert everything day 1, switch the entire team overnight
Phased Migration
Audit → batch convert → hybrid pipeline → full C4D in 4 weeks
Gradual Migration
One team at a time over months — conservative but slow
Phase 1: Audit Your Project Library
1-2 hours. Build the migration spreadsheet.
Before converting anything, take stock of what you have. A quick audit will save you hours later by identifying edge cases and setting realistic expectations for the batch conversion. Go through your project archive and answer these questions:
- ·How many .max files? — Count the total across project folders, asset libraries, and template directories. Determines whether you're looking at a one-afternoon batch job or multi-day conversion.
- ·Which renderer(s)? — Corona, V-Ray, or mix? MAX2C4D supports both, but knowing the split helps you plan testing — verify a sample from each renderer before batch converting everything.
- ·Where are textures stored? — Local drives, mapped network drive (Z:\Textures), UNC path (\\server\share\textures), Synology NAS, OneDrive, or a mix? Texture path resolution is the biggest source of broken renders during migration.
- ·Are there ForestPack objects? — Auto-converted to Chaos Scatter. See the ForestPack to Chaos Scatter guide for the mapping.
- ·External asset dependencies? — Chaos Cosmos, purchased 3dsky models, or Evermotion packs? May need separate conversion and re-linking.
A simple spreadsheet (Excel or Notion) with columns for project name, renderer, texture location, and special objects. This becomes your migration checklist. Cross-reference against the broader 3ds Max → C4D tools ecosystem if you spot edge cases.
Phase 2: Batch Convert Legacy Projects
Point at folders. Convert overnight. Get reports.
Once you know what you're working with, it's time to convert. Doing this file by file would take weeks. The MAX2C4D batch exporter is built specifically for this scenario — it processes hundreds of .max files in a single unattended run.
- ·Multi-folder source selection — point at multiple directories to convert from different locations in one pass.
- ·Filename filtering — convert only files matching specific patterns (all kitchens, all client X, etc.).
- ·Flexible output structure — mirror the original folder structure or flatten into a single output directory.
- ·Headless execution — 3ds Max runs in the background. Start the batch before leaving the office.
- ·Real-time progress monitoring — track which file is processing, how many remain, ETA.
- ·Batch reports — detailed per-file success/failure with specific error messages.
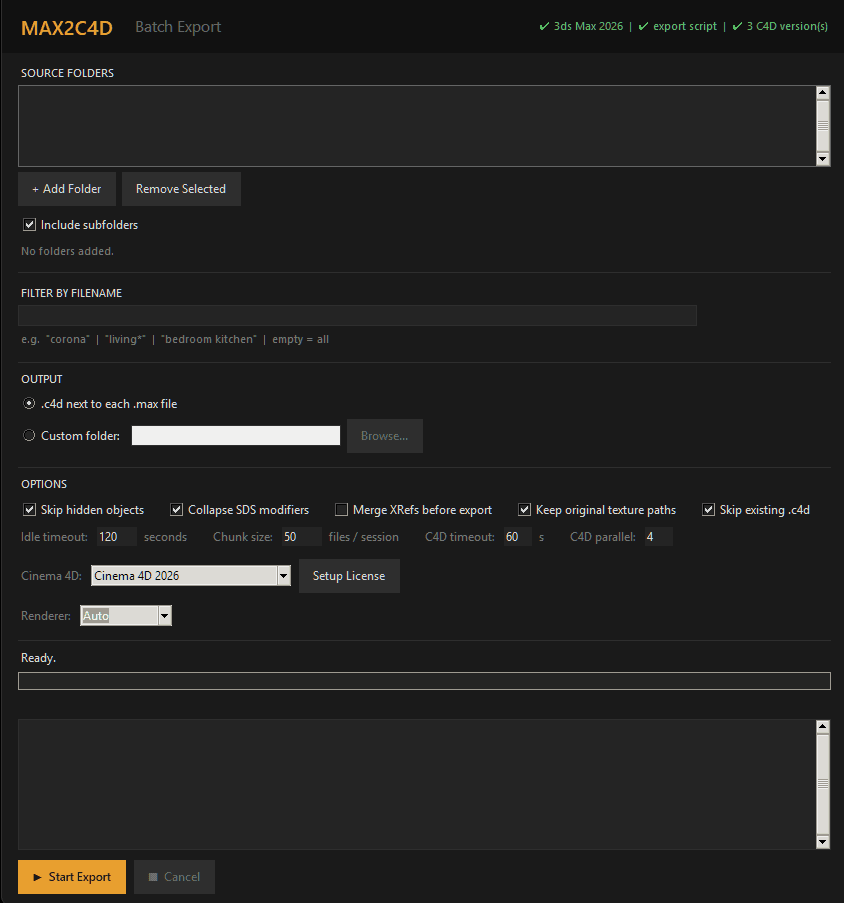
The MAX2C4D batch exporter — select source folders, set output options, convert hundreds of .max files unattended.
A 100+ Archmodels pack with Corona materials converts in a single overnight batch run. Wake up to a Cinema 4D-ready library. Deep dive: batch exporter documentation.
“Migrated about 40 project files over a weekend. Batched them, opened a few to spot-check, kept moving. Nothing dramatic — it just worked.”
Phase 3: Set Up Your Hybrid Pipeline
Keep modeling in Max. Light & render in C4D. Both teams happy.
Most studios don't switch overnight. There's always a transition period where some team members are still in 3ds Max while others have already moved to Cinema 4D. New projects might start in C4D, but active projects stay in Max until they ship. External collaborators send .max files regardless of your internal timeline.
MAX2C4D makes this hybrid workflow practical. The typical setup:
Max users model and shade
Team members still on 3ds Max continue working in their familiar environment. They model, apply Corona or V-Ray materials, and set up scenes as they always have.
Export via MAX2C4D
When a scene is ready, the Max user runs a single MAX2C4D export. The full scene — geometry, materials, lights, cameras, render settings — is packaged for Cinema 4D.
C4D users light and render
Cinema 4D team members import the converted project and continue — adjusting lighting, refining cameras, rendering final output. Corona and V-Ray materials come through intact every time.
During and after the hybrid phase, keep at least one 3ds Max license available — for MAX2C4D exports of incoming client/freelancer .max files. See the complete .max opening guide for the inbound workflow, and the How It Works tutorial for the export step.
No more “can you re-export that?” conversations. No more screenshots of material settings. No more manually rebuilding shaders because the transfer format lost them. The hybrid pipeline works because MAX2C4D preserves the full material graph — for per-scene specifics see the convert 3ds Max scenes guide.
Phase 4: Migrate Your Asset Library
3dsky / Evermotion / CGTrader libraries unlocked for C4D.
Beyond project files, most studios have accumulated a library of purchased and custom-built assets in .max format. Furniture collections from 3dsky, full scene packs from Evermotion, individual models from CGTrader, and in-house template objects — all stored as .max files with Corona or V-Ray materials.
These assets represent a significant investment — both in purchase cost and in the time spent organizing and curating them. Abandoning this library when switching to Cinema 4D would mean rebuilding your asset pipeline from scratch.
The solution is the same batch exporter used for project files. Point it at your asset library folders and convert everything in one pass. Once converted, you have a Cinema 4D-native asset library with all materials intact — ready to drop into any new project without touching 3ds Max.
For a detailed guide on converting assets from specific marketplaces, see Use 3dsky, Evermotion & CGTrader Assets in Cinema 4D. If you're evaluating other tools first, compare with the MaxToC4D alternative.
Texture & Path Management
UNC, NAS, OneDrive — all auto-resolved. /tex folder collected.
During a studio migration, texture paths are the single biggest source of broken renders. A .max file created on one workstation might reference textures on a mapped network drive (Z:\Textures\Wood). Another project points to a UNC path (\\nas01\projects\client\textures). A third uses OneDrive-synced folders that resolve differently on every machine.
When you move these projects to Cinema 4D, every one of those paths needs to resolve correctly — or you get missing bitmap errors across your entire library. Manually relinking textures across hundreds of projects is migration-killing.
MAX2C4D handles this automatically during conversion. Every texture path is resolved at export time, regardless of where it points:
- ·UNC paths — \\server\share\textures resolved and texture files collected.
- ·Mapped network drives — Z:\, N:\, or any drive letter mapping followed to the actual file location.
- ·Synology NAS placeholders — files stored on NAS with on-demand sync are fetched and included.
- ·OneDrive cloud files — cloud-only placeholders downloaded and collected locally.
Each converted project gets a clean /tex folder with every referenced texture copied locally. Zero broken links. Zero manual relinking. The Cinema 4D project moves to any machine, any OS, and every texture loads correctly. Full feature list: Features page.

Art Deco apartment scene converted from 3ds Max to Cinema 4D — all textures resolved and collected automatically, zero broken links.
Typical Migration Timeline
Every studio is different, but here's what a typical migration looks like for a 5-10 person archviz studio with 100+ legacy .max projects.
1-2 hours building the migration spreadsheet.
All projects through the unattended exporter.
Both apps in parallel as team ramps up on C4D.
Studio fully on Cinema 4D, asset library converted.
MAX2C4D runs on the same machines that already run 3ds Max. Batch conversions can run unattended overnight on a single workstation. Real conversion benchmark: Art Deco apartment (847 objects). More studio patterns in studio use cases.
Explore the rest of MAX2C4D
Features
Every supported material, shader and renderer setting.
How it works
Step-by-step walkthrough of a real conversion.
vs FBX
Side-by-side breakdown of what FBX destroys.
vs Manual rebuild
Why one-by-one rebuilding never scales.
Showcase
Real archviz scenes converted by studios.
Use cases
Asset libraries, client deliveries, studio migrations.
Batch exporter
Convert 100+ .max files overnight, unattended.
Pricing
One-time purchase. 1 year of updates. Money-back guarantee.
Related Guides
Convert 3ds Max Scenes to Cinema 4D
Per-scene reference — geometry, materials, lights, cameras, render settings.
How to Open .max Files in Cinema 4D
Useful during hybrid phase when you receive .max files from clients.
Corona Materials in Cinema 4D
How CoronaPhysicalMtl, CoronaBitmap and 80+ shader nodes transfer.
V-Ray 3ds Max to Cinema 4D
V-Ray materials, ~130 render parameters, VRay Proxy preserved.
Forest Pack to Chaos Scatter
How scatter density, slope limits and clusters map to Chaos Scatter.
3dsky / Evermotion Assets in C4D
Convert purchased asset libraries in one batch run.
Frequently Asked Questions
Migrate without losing a single material.
Audit Day 1. Batch convert by Day 3. Full Cinema 4D by Month 2.